A reverse proxy is a server that sits between client requests and the backend services (or servers). It handles incoming requests, forwards them to one or more backend services, and then returns the response to the clients. Traefik proxy is one good example.
Introduction
Traefik is a modern reverse proxy and load balancer designed to handle routing of requests to various backend services. This guide will walk you through setting up Traefik with Docker and configuring it as a reverse proxy.
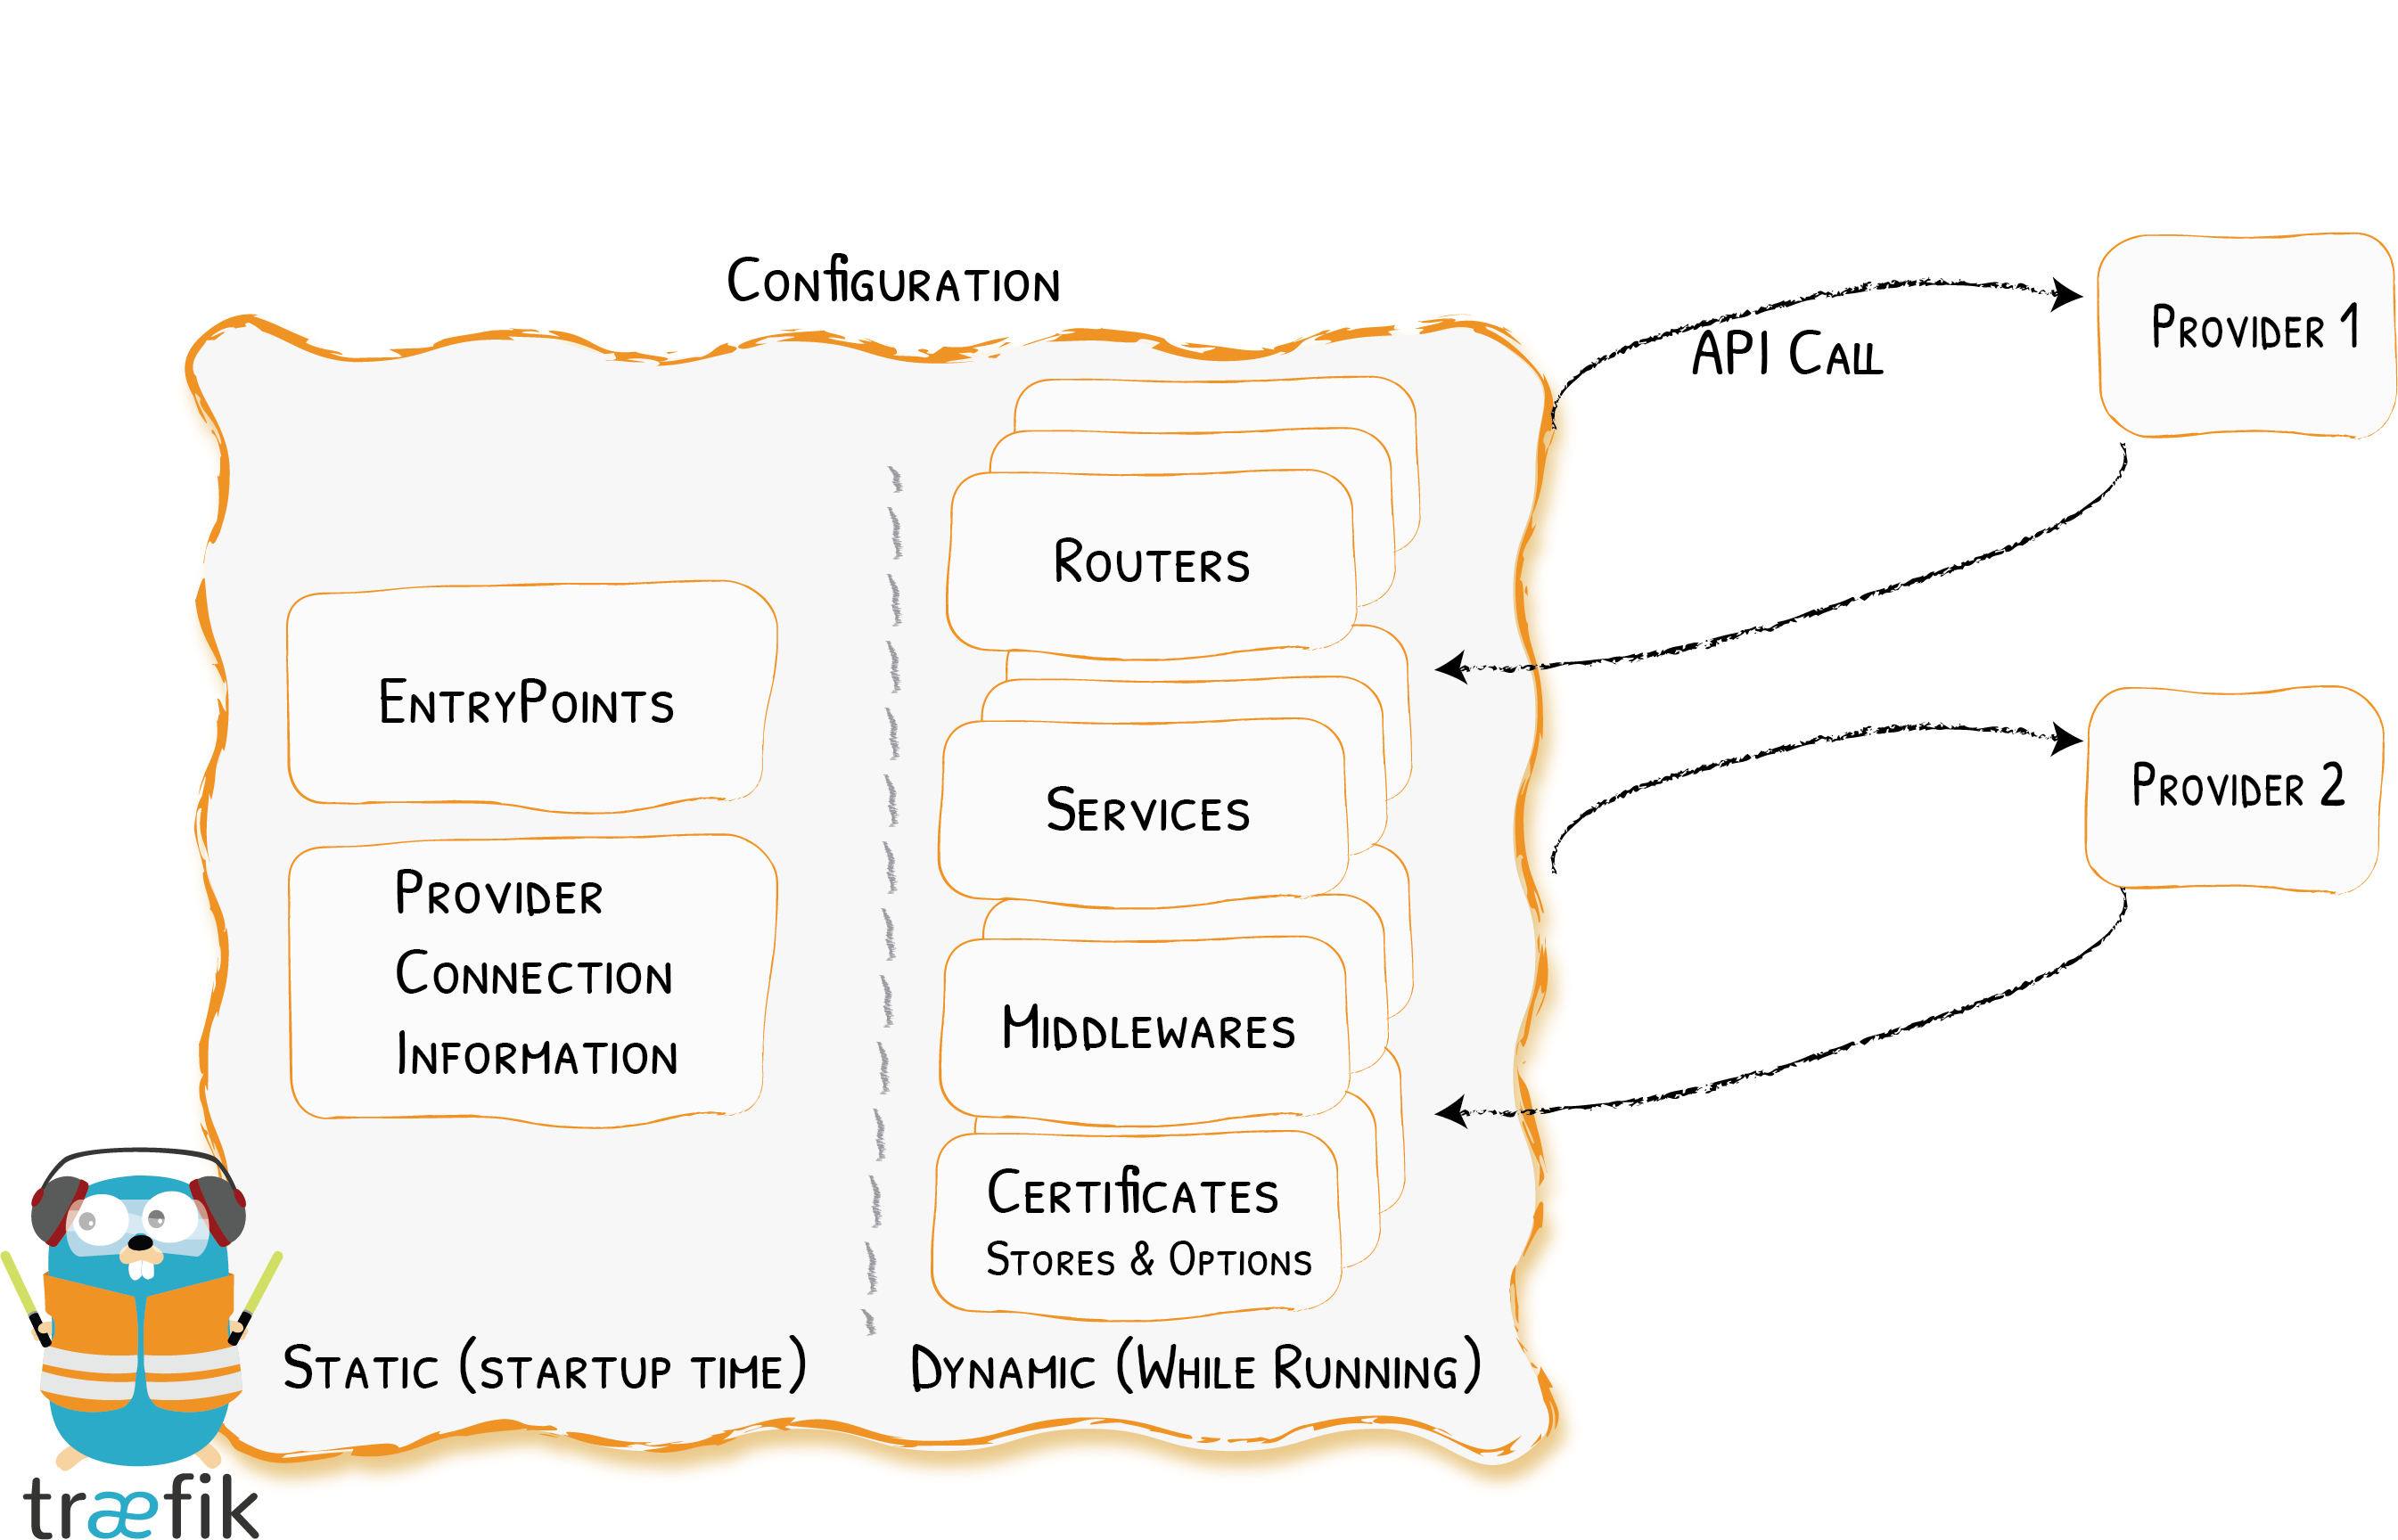
Traefik is based on the concept of EntryPoints, Routers, Middlewares and Services.
The main features include dynamic configuration, automatic service discovery, and support for multiple backends and protocols.
EntryPoints: EntryPoints are the network entry points into Traefik. They define the port which will receive the packets, and whether to listen for TCP or UDP.
Routers: A router is in charge of connecting incoming requests to the services that can handle them.
Middlewares: Attached to the routers, middlewares can modify the requests or responses before they are sent to your service
Services: Services are responsible for configuring how to reach the actual services that will eventually handle the incoming requests.
By the end of this document we will touchbase every aspect of this image from Traefik
I have referred to content from various enthusiasts like Techno Tim and many others to make this guide. For more detailed information, you can always check the official Traefik documentation .
Folder Structure
Establish the Traefik-specific folder structure to incorporate the required configuration for initiating the reverse proxy. This structure builds upon the previously defined layout created for the Docker VM
setup
.
mkdir -p ~/docker/data/traefik # Data folder for Traefik
mkdir -p ~/docker/data/traefik/config # To store traefik config
mkdir -p ~/docker/logs/traefik # Logs folder for Traefik
touch ~/docker/scripts/traefik.yml # Script file that will be integrated into Master Docker Compose file.
Edit the master docker compose file and add the first line of code to include the new traefik.yml script.
nano ~/docker/docker-compose.yml
include:
  - scripts/traefik.yml
Static Configuration
Let us start simple with the Traefik script, we will make a lot of changes by the end of this document. Edit the ~/docker/scripts/traefik.yml and copy paste the below content
Minimum Config
services:
  traefik:
    # The official v3 Traefik docker image
    image: traefik:v3.3
    container_name: traefik
    security_opt:
      - no-new-privileges:true
    restart: unless-stopped
    command:
      # Enables the web UI
      - "--api.insecure=true"
      # Allow Traefik to gather configuration from Docker
      - "--providers.docker=true"
    ports:
      - "80:80"
      - "443:443"
      - "8080:8080"

    volumes:
      # So that Traefik can listen to the Docker events
      - /var/run/docker.sock:/var/run/docker.sock
Enabling the Traefik dashboard and API in an insecure mode is not recommended on production servers. By the end of this guide we will disable that. For now lets move on and access the dashboard.
Launch Traefik! by starting your container with the below command
docker compose up -d traefik
Executing this command does two things it creates a network called traefik_default and runs the container on that network.
We have a traefik instance up and running, visit the traefik raw data using this url http://dockerserverip:8080/api/rawdata and the dashboard with this url http://dockerserverip:8080/dashboard/#/

Traefik Subnet
In Docker, networks allow containers to communicate with each other. You can create a network for Traefik and assign containers to it. Creating a network helps to isolate this containers from others.
Make the below changes in the master docker-compose file.
Traefik Custom Network
nano ~/docker/docker-compose.yml
networks:
  traefik_network:
    name: traefik_network
    driver: bridge
    ipam:
      config:
        - subnet: 192.168.1.0/24
Creating a custom docker network for Traefik using the bridge driver and assigning a specific subnet. IPAM (IP Address Management) makes sure that containers created on this network are assigned IP’s in the subnet of 192.168.1.*
Since the network definition is ready, let us assign our traefik container to the new network. Make a a few changes to the traefik.yml. # ….. in the below config means exisiting code not displayed.
nano ~/docker/scripts/traefik.yml*
services:
  traefik:
    image: traefik:3.3
  # .....
  networks:
      traefik_network:
        ipv4_address: 192.168.1.254
Included traefik container on this network with a static ip (192.168.1.254). After making changes to both the files, our drill remains the same to bring down the traefik container and bring it back again.
docker compose down traefik
docker compose up -d traefik
Check the ipaddress of the container with the below command
sudo docker ps -q | xargs -n 1 sudo docker inspect -f '{{.Name}}%tab%{{range .NetworkSettings.Networks}}{{.IPAddress}}%tab%{{end}}' | sed 's#%tab%#\t#g' | sed 's#/##g' | sort | column -t -N NAME,IP\(s\) -o $'\t'

Logs
Logging is crucial for monitoring and debugging your reverse proxy setup. Traefik can generate both access logs (for incoming requests) and error logs (for any issues that occur).
Create log files:
Run the following commands to create the necessary log files:
touch ~/docker/logs/traefik/access.log
touch ~/docker/logs/traefik/traefik.log
Add the log related config to the compose file nano ~/docker/scripts/traefik.yml
traefik:
    image: traefik:v3.3
    volumes:
      - /home/ubuntu/docker/logs/traefik:/logs
    command:
      #Logs
      - --log=true
      - --log.filePath=/logs/traefik.log
      - --log.level=INFO # (Default: error) DEBUG, INFO, WARN, ERROR, FATAL, PANIC

      - --accessLog=true
      - --accessLog.filePath=/logs/access.log
      - --accessLog.bufferingSize=100 # Configuring a buffer of 100 lines
      - --accessLog.filters.statusCodes=204-299,400-499,500-599
In the volumes section mount the logs directory into the container under /logs and the rest is mostly self explanatory with logs getting stored on the physical server. With every change lets us bring down the container to see the changes.
Drill remains the same to bring up the container with
docker compose down
docker compose up -d traefik
We can access the logs with the following command watch tail -n 15 logs/traefik/traefik.log

Traefik team asks us to enable the Stats collection.
Enable the Stats Collection`
Also checking for new stable version nano ~/docker/scripts/traefik.yml
traefik:
    image: traefik:v3.3
      command:
        # Check for new version
        - --global.checkNewVersion=true
        # Enable stats collection
        - --global.sendAnonymousUsage=true
Routing & Load Balancing
Entry Points
In Traefik, an Entry Point defines how and where incoming traffic is received. Traefik can handle multiple entry points for different types of traffic (e.g., HTTP, HTTPS, or other custom ports like WebSocket, etc.). By default, Traefik listens on port 80 for HTTP traffic and 443 for HTTPS.
traefik:
    image: traefik:v3.3
      command:
        - --entrypoints.web.address=:80
        - --entrypoints.websecure.address=:443
        - --entrypoints.traefik.address=:8080
We are defining entry points and also naming them. In the upcoming config we will see how we will use these names. Now you know the drill to bring up the container.
 Compare with the initial screenshot of our dashboard and you see one more entry point defined. Port HTTP is renamed to WEB and port 443 is renamed to WEBSECURE
Traffic Redirection
Redirect HTTP traffic (port 80) to HTTPS traffic (port 443). This is commonly done in reverse proxy setups to ensure that all traffic is encrypted using HTTPS, providing better security.
traefik:
    image: traefik:v3.3
      command:
        - --entrypoints.web.http.redirections.entrypoint.to=websecure
        - --entrypoints.web.http.redirections.entrypoint.scheme=https
        - --entrypoints.web.http.redirections.entrypoint.permanent=true
Enable Dynamic Configuration
Traefik gets its dynamic configuration from providers: whether an orchestrator, a service registry, or a plain old configuration file.
traefik:
    image: traefik:v3.3
      volumes:
        - /home/ubuntu/docker/data/traefik/config:/config
      command:
        # Load dynamic configuration from one or more .toml or .yml files in a directory
        - --providers.file.directory=/config
        # Only works on top level files in the config folder
        - --providers.file.watch=true
Mounting config folder in the volume section and letting traefik know to watch this directory for any dynamic configuration. We will keep adding a lot of dynamic config into this folder in the future guides. As we add more and more services in the homelab.
Advanced Configuration
Transport Layer Security
Till now we have made changes to our configuration to route traffic from web to websecure and now its time secure tha traffic with a transport layer security; in short tls.
Create a tls-options.yml file in config directory and copy paste the below in the file
vi ~/docker/data/traefik/config/tlsoptions.yml
tls:
  options:
    tlsoptions:  #Name specified goes into the traefik config
      minVersion: VersionTLS13 # Enforce TLS 1.3
      cipherSuites:
        - TLS_AES_128_GCM_SHA256
        - TLS_AES_256_GCM_SHA384
        - TLS_CHACHA20_POLY1305_SHA256
      curvePreferences:
        - CurveP521
        - CurveP384
      sniStrict: true
This ensures that the HTTPS traffic on port 443 is handled securely using TLS, which encrypts the traffic between the server and the client (e.g., browsers) and also enforces the client to use TLS 1.3 which is the latest.
traefik:
    image: traefik:v3.3
      command:
        # Enable TLS for HTTPS (port 443)
        - --entrypoints.websecure.http.tls=true
        - --entrypoints.websecure.http.tls.options=tlsoptions@file
Certificate Resolver - Let’s Encryypt
Configure Traefik to use an ACME provider (like Let’s Encrypt) for automatic certificate generation.
Certificate Storage
Traefik saves the certificates in a file called acme.json and this file should be restricted with read only access to user.
mkdir -p ~/docker/data/traefik/acme
touch ~/docker/data/traefik/acme/acme.json
chmod 600 ~/docker/data/traefik/acme/acme.json
Since I am using dnsChallenge with cloudflare as a provider I need to generate a DNS_API_TOKEN in cloudflare website. For more information refer this page
Cloudflare DNS API Token Secret
Login to your cloudflare account, go to Profile -> API Tokens -> Create Token -> Create Custom Token

We have key ready, let us create a folder to have all the secrets like API keys, passwords etcetra stored in one location.
mkdir -p ~/docker/secrets
vi ~/docker/secrets/cf_token
Copy the generated api key into cf_token We need to load this secret into the docker file. Edit the master docker-compose.yml and add a new section secrets
secrets:
  cf_token:
    file: /home/ubuntu/docker/secrets/cf_token
Let us add the secret into the traefik.yml so that we can pass it into the container. Why are we taking this route, no one wants to have the password documented into github :)
traefik:
    image: traefik:v3.3
    volumes:
        - /home/ubuntu/docker/data/traefik/acme/acme.json:/acme.json
    environment:
      - CF_DNS_API_TOKEN_FILE:/run/secrets/cf_token
    secrets:
      - cf_token
Map the cert storage using the volumes. Let’s Encrypt has strict rules on hitting thir production servers. Make sure you try this approach using this - –certificatesResolvers.dns-cloudflare.acme.caServer=https://acme-staging-v02.api.letsencrypt.org/directory to resolve a certificate. I will tell when to comment this
traefik:
    image: traefik:v3.3

      command:
      # Specify the default cert resolver as dns-cloudflare
      - --entrypoints.websecure.http.tls.certresolver=dns-cloudflare
      - --entrypoints.websecure.http.tls.domains[0].main=example.com
      - --entrypoints.websecure.http.tls.domains[0].sans=*.example.com

      # LetsEncrypt Staging Server - Comment this to get prod certificate
      - --certificatesResolvers.dns-cloudflare.acme.caServer=https://acme-staging-v02.api.letsencrypt.org/directory
      - --certificatesResolvers.dns-cloudflare.acme.storage=/acme.json
      - --certificatesResolvers.dns-cloudflare.acme.dnsChallenge.provider=cloudflare
      - --certificatesResolvers.dns-cloudflare.acme.dnsChallenge.resolvers=1.1.1.1:53,1.0.0.1:53
      - --certificatesResolvers.dns-cloudflare.acme.dnsChallenge.delayBeforeCheck=90
You know the drill, bring up the traefik container. Check the logs, if there is no error, check the acme.json file and the certificate should be there. What’s happening behind the scenes. Lets Encrypt reaches cloudflare to check if you are rightful owner to the domain claimed and if you are a certificate is issued from their staging server.
Bring down the container and empty the acme.json file to store the certificate from the prod server. Comment out the staging server and re run the container to see a valid prod certificate for your domain.
docker compose down traefik
> ~/docker/data/traefik/acme/acme.json #This empties all the content from acme.json
Middlewares
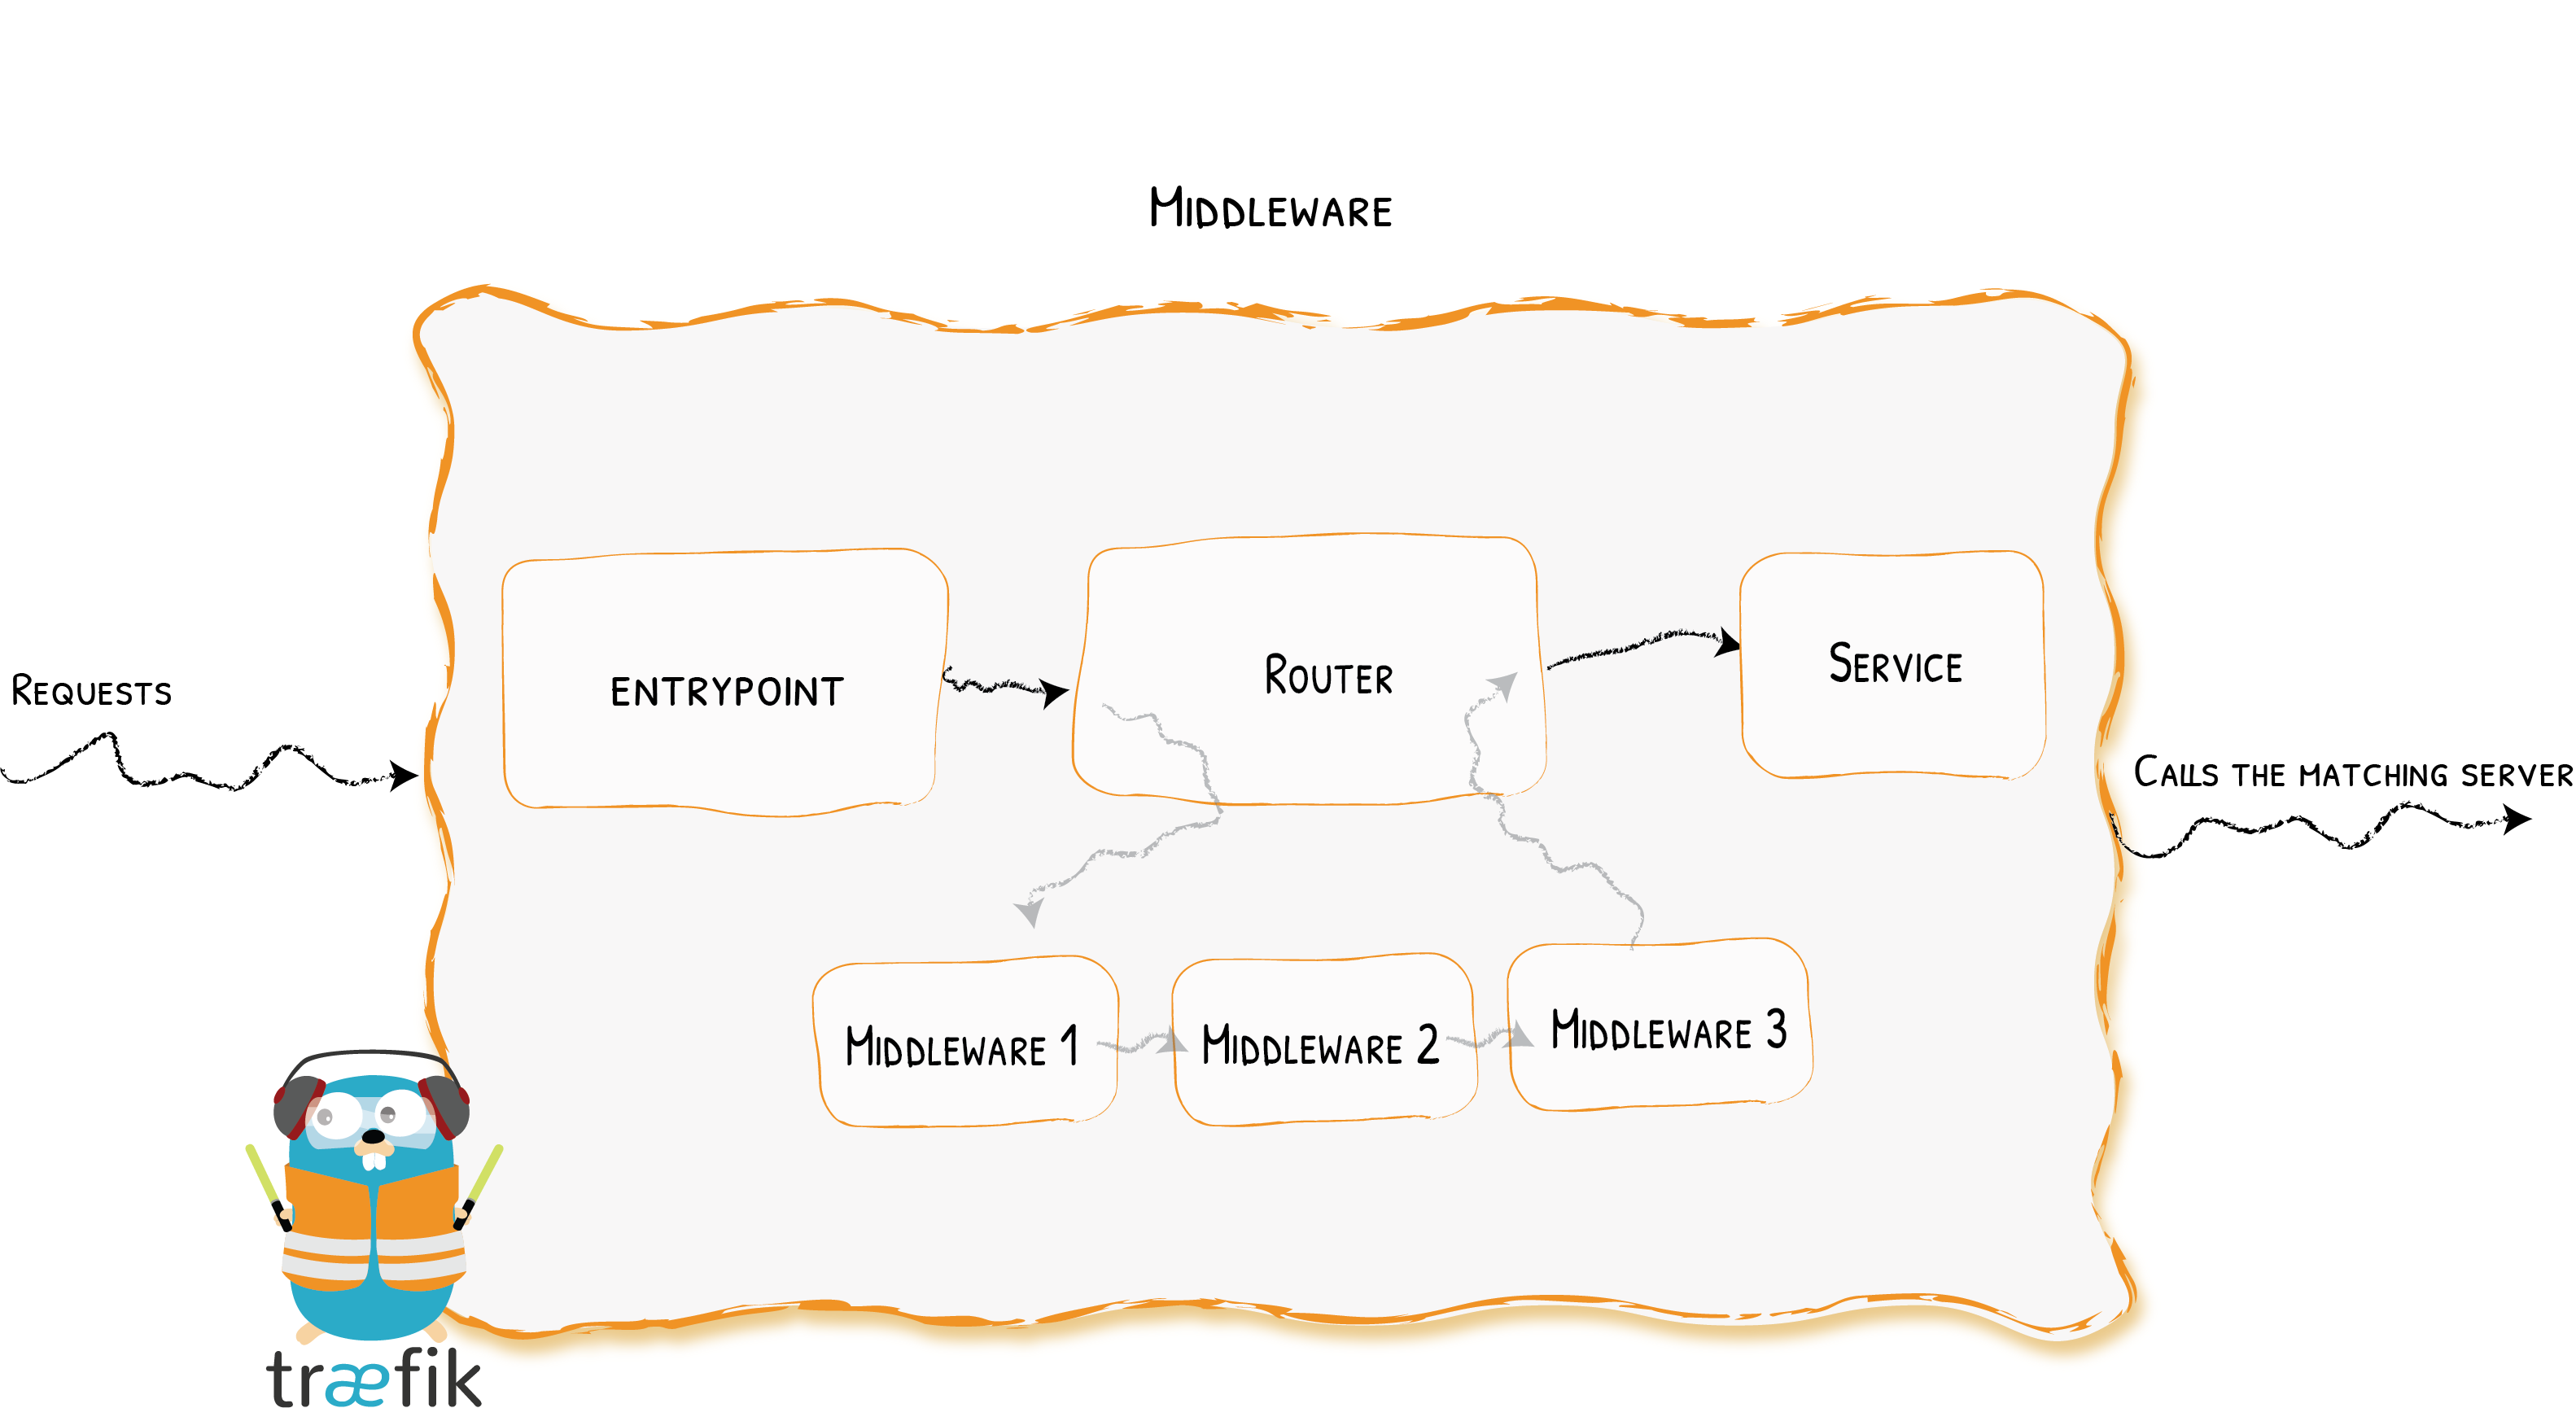 Attached to the routers, pieces of middleware are a means of tweaking the requests before they are sent to your service (or before the answer from the services are sent to the clients).
There are several available middleware in Traefik, some can modify the request, the headers, some are in charge of redirections, some add authentication, and so on.
Middlewares that use the same protocol can be combined into chains to fit every scenario.
vi ~/docker/data/traefik/config/basic-config.yml
http:
  middlewares:
    default-headers:
      headers:
        frameDeny: true
        browserXssFilter: true
        contentTypeNosniff: true
        forceSTSHeader: true
        stsIncludeSubdomains: true
        stsPreload: true
        stsSeconds: 15552000
        customFrameOptionsValue: SAMEORIGIN
        hostsProxyHeaders:
            - "X-Forwarded-Host"
        customRequestHeaders:
          X-Forwarded-Proto: https
        # The X-Robots-Tag HTTP header is used to control the behavior of search engine
        # crawlers and other robots with respect to indexing content on a website.
        customResponseHeaders:
          X-Robots-Tag: "none,noarchive,nosnippet,notranslate,noimageindex,"
          server: ""
        # My website is just a static website and I only need GET to serve the page and options for preflight
        accessControlAllowMethods:
          - GET
          - OPTIONS
        accessControlMaxAge: 3600
        permissionsPolicy: "camera=(), microphone=(), geolocation=(), payment=(), usb=()"

    # Private Local IPs & Cloudflare IPs
    default-whitelist:
      ipAllowList:
        sourceRange:
          - "10.0.0.0/8"
          - "192.168.0.0/16"
          - "172.16.0.0/12"
          - "173.245.48.0/20"
          - "103.21.244.0/22"
          - "103.22.200.0/22"
          - "103.31.4.0/22"
          - "141.101.64.0/18"
          - "108.162.192.0/18"
          - "190.93.240.0/20"
          - "188.114.96.0/20"
          - "197.234.240.0/22"
          - "198.41.128.0/17"
          - "162.158.0.0/15"
          - "104.16.0.0/13"
          - "104.24.0.0/14"
          - "172.64.0.0/13"
          - "131.0.72.0/22"

    chain-no-auth:
      chain:
        middlewares:
          - default-whitelist
          - default-headers
We are creating two middleware called default-headers & default-whitelist and a chain of middleware which is referred as chain-no-auth
Comment out the staging environment and bring up the container to check everything is working and traefik is able to retrieve prod certificate for the domain
# - --certificatesResolvers.dns-cloudflare.acme.caServer=https://acme-staging-v02.api.letsencrypt.org/directory
cat ~/docker/data/traefik/acme/acme.json

Most of the Traefik configuration is completed, put this into action with a demo container.
NGINX Demo
nginxdemos/nginx-hello is a publicly available Docker image hosted on Docker Hub. It’s a simple demonstration of an Nginx web server, often used to show how Nginx works in a containerized environment.
This Docker image runs an Nginx server and serves a basic “Hello World” HTML page, which is typically used for testing and learning purposes. When you pull and run this image, it starts a container that serves a very basic web page with the text “Hello, World!”.
traefik:
    image: traefik:v3.3
    command:
      - --providers.docker.exposedByDefault=false
    ....
    myapp:
      image: nginxdemos/nginx-hello
      container_name: nginxhello
      security_opt:
        - no-new-privileges:true
      restart: unless-stopped
      networks:
        - traefik_network
      ports:
        - 8081:8080
      labels:
        - "traefik.enable=true"
        # Http Routers
        - "traefik.http.routers.nginxhello.entrypoints=websecure"
        - "traefik.http.routers.nginxhello.rule=Host(`hello.example.com`) || Host(`www.hello.example.com`)"
        # Middlwares
        - "traefik.http.routers.nginxhello.middlewares=chain-no-auth@file"
        # HTTP Services
        - "traefik.http.routers.nginxhello.service=nginxhello-svc"
        - "traefik.http.services.nginxhello-svc.loadbalancer.server.port=8080"
We will understand this configuration after the container is brought up.
docker compose up -d
# Pulls down nginxhello image and creates a container
Attached a few labels to the container so that traefik sees and creates the routers, services and attaches them.
- providers.docker.exposedByDefault=false: By default every container is exposed to the public and this configuration stops. This is not a label its a command to the traefik container.
Container Labels
Routes
- traefik.enable=true: Tells Traefik to monitor and route to this container. Without this, Traefik ignores the container.
- traefik.http.routers.nginxhello.entrypoints=websecure: Creates a router named nginxhello and listens on the websecure entrypoint.
- traefik.http.routers.nginxhello.rule=Host: Creates a rule that this router should trigger if the request header carries example.com or www.example.com
Middleware
- traefik.http.routers.nginxhello.middlewares=chain-no-auth@file: Applies a middleware chain named chain-no-auth, defined in a static config file. The @file indicates it’s from Traefik’s file provider and is located in the config folder that was created earlier.
Service Definition
- traefik.http.routers.nginxhello.service=nginxhello-svc: Connects the router to a service called nginxhello-svc
- traefik.http.services.nginxhello-svc.loadbalancer.server.port=8080: and this service is listening on port 8080 inside the container. Outside traffic is connected to port 8081. Refer this line in ports section of the myapp definition. ports: - 8081:8080
If everything followed as per the guide you would be able to access http://hello.example.com

Final Changes
Let us disable accessing dashboard through –api.insecure=true and create a route in traefik to access this dashboard. I highly don’t recommend this approach as exposing traefik dashboard is not a great idea.
Dashboard with Basic Auth
Let us create a basic authentication for the dashboard. We cannot place this dashboard on the internet without a password. How to generate a password
htpasswd -cBb ~/docker/secrets/basic_auth <username> <passwd>
# -c  Create a new file.
# -B  Force bcrypt encryption of the password (very secure).
# -b  Use the password from the command line rather than prompting for it.
# Replace <username> and <passwd>
Let us include the basic auth into the docker compose and also into the middlewares so that the password will be prompted.
nano ~/docker/docker-compose.yml
secrets:
  basic_auth:
    file: $DOCKERHOME/secrets/basic_auth
nano ~/docker/scripts/traefik.yml
secrets:
      - cf_token
      - basic_auth
nano ~/docker/data/traefik/config/basic-config.yml
http:
  middlewares:
    basic-auth:
      basicAuth:
        usersFile: "/run/secrets/basic_auth"

    chain-basic-auth:
      chain:
        middlewares:
          - default-whitelist
          - default-headers
          - basic-auth
Labels for Traefik Container
Let us make changes to the traefik configuration and create the route to access this dashboard using internet. Disable port 8080 and remove the entry point too.
traefik:
    image: traefik:v3.3
    ports:
      # 8080:8080
    command:
      - --api.insecure=false
      # - --entrypoints.traefik.address=:8080
    secrets:
      - basic_auth
    labels:
      - traefik.enable=true
      # HTTP Routers
      - "traefik.http.routers.traefik-rtr.entrypoints=websecure"
      - "traefik.http.routers.traefik-rtr.rule=Host(`traefik.example.com`)"
      # Services - API
      - "traefik.http.routers.traefik-rtr.service=api@internal"
      # Middlewares
      - "traefik.http.routers.traefik-rtr.middlewares=chain-basic-auth@file" # For Basic HTTP Authentication
Exposing the dashboard is not really recommended by traefik too. What can be done as an alternative is define an entry in your DNS Server and point that to your docker server.
CNAME Record
Create a CNAME record as per the label above traefik.example.com

Dashboard Access with Basic Auth
When prompted for username, provide the username that was used with htpasswd

Compare this with the previous image only web and websecure are the only entry points.